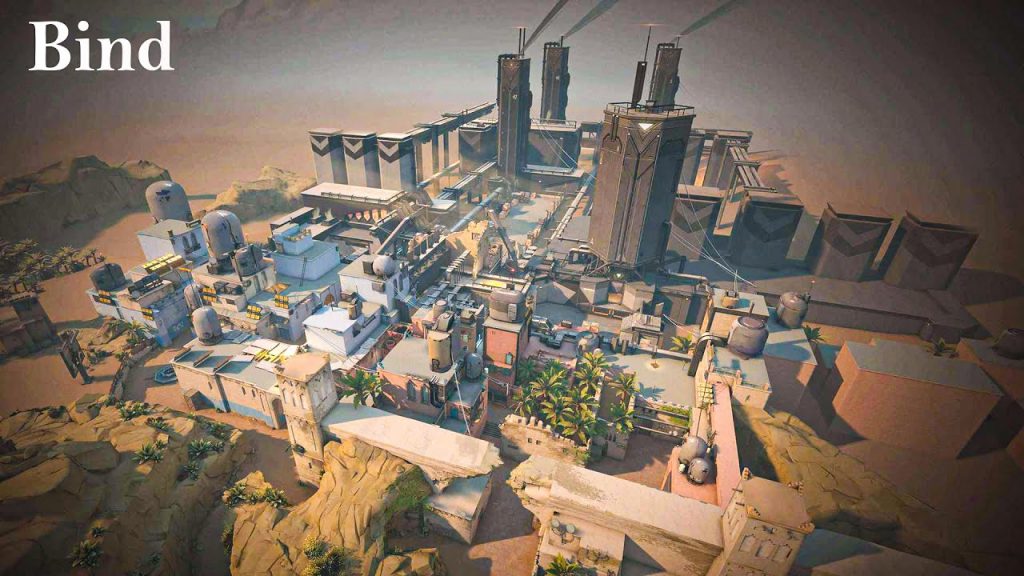
On behalf of the Blix team, we’re diving deep into Bind, one of Valorant’s most dynamic and tactically rich maps. With its signature teleporters, tight angles, and key choke points, Bind challenges players to think fast, rotate smart, and outmaneuver their opponents.
Before all, start with learning general tricks, not tied to a specific map – like knowing the minimap tricks, or current Agent-to-map choosings. You’ll need it to comprehend examples in the article below.
And now – to this guide. We’ll break down top strategies, optimal agent picks, and role-specific tips to help you stay one step ahead. Controlling Showers like a pro, isolating B site defenders with surgical precision…
Contents
- 1 Highlights
- 2 Latest Bind Map Changes
- 3 A Site Changes:
- 4 B Site Changes:
- 5 General Tips for Bind
- 6 Master Teleporter Usage
- 7 Control Key Areas
- 8 Effective Communication
- 9 Three Strategic Approaches on Bind
- 10 Split Execution
- 11 A Short Control
- 12 B Site Isolation
- 13 Role-Specific Advice
- 14 Controllers
- 15 Duelists
- 16 Initiators
- 17 Sentinels
- 18 Bind Strategy FAQ
Highlights
- Short recap on Bind’s recent changes
- General tips to dominate the map
- Three different strategies break down
- Best Agents for each strategy
- Additional: FAQ on Bind mastery
Latest Bind Map Changes
A Site Changes:
A Site has undergone significant changes, particularly around Showers. The most notable shift is the teleporter relocation—previously landing players behind boxes in A Lobby, it now drops players closer to Showers. This adjustment enables faster rotations from B to A, creating more opportunities for quick misdirection and unpredictable plays. Additionally, the entry into Showers and its dimensions have been widened, reducing the choke point for attackers. Inside A Site, a new rectangular box (which is wall-bangable) has been added parallel to the entry, offering new planting spots but requiring caution from planters.
B Site Changes:
B Site saw fewer changes, but each one was impactful. The CT entry has been widened, similar to Showers, making it harder for defenders to hold tight angles. The most intriguing change is the addition of a small vent in B Elbow, which introduces new possibilities for utility usage. Sage can create inventive walls, and agents like Skye and Gekko can flash through the vent to clear out defenders. This also opens up potential Molotov lineups for Brimstone and Phoenix, giving post-plant teams more control options. Viper’s utility gains even more value after these updates, while Raze’s effectiveness on B might be reduced slightly.
General Tips for Bind
Master Teleporter Usage
The teleporters connecting A Short to B Short and B Long to A Lobby are pivotal for quick rotations and fakes. However, they emit a loud sound upon use, alerting opponents. Utilize them strategically to mislead enemies or reposition swiftly.
Example
You're defending B site and hear attackers pushing Hookah hard. Instead of rotating slowly through spawn, take the B Long teleporter to A Lobby. Even though the sound reveals your position, it puts you closer to defend a possible A rotate.
Fake Play
On attack, send a Raze Boom Bot through Hookah and have a teammate fake pressure there while your team teleports from A Short to B, catching the defenders off-guard.
Control Key Areas
Dominating zones like Showers (A Bath) and Hookah (B Window) are crucial. These areas serve as primary conduits for site attacks and defenses, and securing them can grant significant tactical advantages.
Example
Securing Showers (A Bath) gives your team a powerful pivot point for A site control. You plant for Showers, and with a player holding post-plant from that position, defenders are forced to clear this dangerous angle.
Defender Play
As a defender, holding Hookah with a Cypher Trapwire and Camera can provide early information and allow a teammate to rotate before a full execution happens.
Effective Communication
Familiarize yourself with Bind’s callouts to enhance team coordination. Clear communication about enemy positions and planned movements can be the difference between victory and defeat.
Example
You spot two players pushing B Long while your Killjoy hears movement in Showers. Calling out that information early allows your team to anticipate a possible split push.
Rotational Call
Mid-round, if an opponent uses the A Short to B Teleporter, call it immediately so defenders can prepare for a site change.
Three Strategic Approaches on Bind
Split Execution
How tf is bind meant to be played?
Reddit
Attack Scenario
This strategy involves dividing the team to apply pressure on multiple fronts, forcing defenders to spread thin.
Goal
Apply pressure on multiple fronts to confuse and stretch defenders.
Best Agents

- Skye: Flashes and info-gathering help clear multiple angles across sites.
- Brimstone: Smokes to cover both sites from a distance.
- Omen: Teleports to suppress and stay unpredictable.
Setup
- 2 players push B Long.
- 1 controls Hookah for potential lurk.
- 1 challenge A Short.
- 1 pressures Showers.
Execution
- Raze uses a Boom Bot through Hookah to clear defenders.
- Sova sends a Recon Bolt into B site to tag any players hiding Backsite or Elbow.
- Meanwhile, Viper places her wall to cut vision between A site and Defender Spawn, giving the team cover for rotations.
- Brimstone smokes A Tower, and A Lamps from a safe position, applying pressure on A while the real push happens on B.
This confuses defenders, forcing them to guess the actual site of engagement.
Short either side if needed, making site execution unpredictable.
Defense Scenario
Control key zones early, gather intel with utility, delay pushes with smokes and traps, and play for a coordinated retake if attackers commit.
Goal
Prevent attackers from gaining control of multiple choke points simultaneously by denying early map control and isolating attackers before they converge on the site.
Best Agents
- Sova: Recon Bolt and Owl Drone gather intel from long-range, plus constant vision on choke points, preventing surprise executes.
- Cypher: Trapwires and Spycam provide critical early info in Hookah and Showers, detecting split pushes before they fully develop.
- Viper: Toxic Screen blocks key angles like A Short or B Long. Utility reduces vision and slows down multi-angle pushes.

Setup
- 2 players push B Long.
- 1 pressures Hookah.
- 1 lurks around A Short.
- 1 controls Showers.
If defenders don’t react quickly, they’ll be overwhelmed by pressure from multiple angles.
Execution
- Cypher places Trapwires in Hookah and Showers to detect early movement.
- Sova fires a Recon Bolt into B Long to gather intel while Raze uses her Boom Bot to clear Hookah.
- Viper sets up her wall to block A Short or Showers, slowing down the push.
- Brimstone smokes A Short and B Elbow to delay rotations, while a defender anchors in U-Haul to hold A site.
If attackers commit, defenders reposition quickly and play for a coordinated retake.
A Short Control
Am i the only one who hates bind
Reddit
Attack Scenario:
Seizing control of A Short early can provide a direct pathway to the A site, allowing for swift executions.
Goal
Gain early dominance of A Short, giving attackers a fast pathway to the A site or defenders early control to prevent fast executes.
Best Agents

- Raze: Clears tight angles aggressively.
- Viper: Her wall blocks multiple sightlines and makes the push safer.
- Phoenix: Entry flashes and Molotovs to create space.
Setup
- 2 Players: Anchor A Site—1 holds A Short and 1 holds Showers to control both entry points.
- 1 Player: Positioned in U-Haul (A Lamps) to delay or deny site entries.
- 1 Player: Rotates through A Heaven or CT to provide support with utility or Operator coverage.
- 1 Player: Holds Mid/Teleporter for fast rotations and to watch for lurks or split pushes.
Execution
- Raze launches a Paint Shells grenade into A Lamps (U-Haul), forcing defenders to reposition.
- Viper deploys a Toxic Screen that cuts off A Heaven and Lamps, creating a clean pathway to the site.
- Sova follows up with a Recon Bolt to reveal any lingering enemies.
- Phoenix flashes around the corner, blinding anyone peeking from Heaven or Lamps.
Defense Scenario
Denying A Short control prevents attackers from establishing a foothold toward A site. Locking down A Short early forces attackers to waste utility or commit to slower, riskier pushes.
Goal
Secure A Short and Showers control early, preventing attackers from gaining fast site access and allowing defenders to anchor strong positions.
Best Agents
- Viper – Deploys her Toxic Screen to block vision through A Short and Showers, slowing down attacker movement.
- Raze – Clears A Short aggressively with Boom Bot and delays pushes with Paint Shells.
- Phoenix – Uses flashes and molotovs to hold chokepoints and contest early aggression.

Setup
- 2 Players: Anchor A Site—1 holds A Short, and 1 holds Showers to contest both entry points.
- 1 Player: Positioned in U-Haul (A Lamps) to delay or deny site entries with utility.
- 1 Player: Rotates through A Heaven or CT to provide long-range support with an Operator or utility.
- 1 Player: Holds Mid/Teleporter for quick rotations and to catch lurkers or split pushes.
Execution
- Raze: Sends a Boom Bot down A Short early to gather info and force attackers to use utility. If pressure increases, she follows up with Paint Shells to disrupt the push.
- Viper: Deploys her Toxic Screen across A Short and Showers, cutting off vision and forcing attackers to push through decay. Her Snakebite can further delay pushes if necessary.
- Phoenix: Holds A Short with curveball flashes around corners and uses Hot Hands to stall attackers or deny site entry.
- Defenders Rotate: If attackers attempt a fast push, defenders reposition and reinforce A site, ensuring a coordinated hold or retake if needed.
B Site Isolation
Bind is the worst map. Change my mind.
Reddit
Attack Scenario:
B Site Isolation aims to overwhelm defenders by applying pressure from multiple angles—typically through B Long and Hookah—to cut off rotations and isolate site anchors. This strategy forces defenders into unfavorable duels or traps them in predictable post-plant positions.
Goal
Overwhelm B site defenders by isolating them and applying pressure from both Hookah and B Long.
Best Agents

- Brimstone: Smokes to cover both sites from a distance.
- Skye: Flashes and info-gathering help clear multiple angles across sites.
- Omen: Teleports to supp.
Setup
- 2 players push B Long.
- 1 controls Hookah for potential lurk.
- 1 challenges A Short.
- 1 pressures Showers.
Execution
- Raze uses a Boom Bot through Hookah to clear defenders.
- Sova sends a Recon Bolt into B site to tag any players hiding Backsite or Elbow.
- Meanwhile, Viper places her wall to cut vision between A site and Defender Spawn, giving the team cover for rotations.
- Brimstone smokes A Tower, and A Lamps from a safe position, applying pressure on A while the real push happens on B.
This confuses defenders, forcing them to guess the actual site of engagement.
Defense Scenario
Control key zones early, gather intel with utility, delay pushes with smokes and traps, and play for a coordinated retake if attackers commit.
Goal
Prevent attackers from gaining control of multiple choke points simultaneously by denying early map control and isolating attackers before they converge on the site.
Best Agents
- Cypher: Trapwires and Spycam provide critical early info in Hookah and Showers, detecting split pushes before they fully develop.
- Viper: Toxic Screen blocks key angles like A Short or B Long. Utility reduces vision and slows down multi-angle pushes.
- Sova: Recon Bolt and Owl Drone gather intel from long-range, plus constant vision on choke points, preventing surprise executes.

Setup
- 2 players push B Long.
- 1 pressures Hookah.
- 1 lurks around A Short.
- 1 controls Showers.
If defenders don’t react quickly, they’ll be overwhelmed by pressure from multiple angles.
Execution
- Cypher places Trapwires in Hookah and Showers to detect early movement.
- Sova fires a Recon Bolt into B Long to gather intel while Raze uses her Boom Bot to clear Hookah.
- Viper sets up her wall to block A Short or Showers, slowing down the push.
- Brimstone smokes A Short and B Elbow to delay rotations, while a defender anchors in U-Haul to hold A site.
If attackers commit, defenders reposition quickly and play for a coordinated retake.
Role-Specific Advice
Controllers
Use smoke to obscure common defender sightlines such as A Tower (Heaven), A Lamps, B Backsite, and B Elbow. This facilitates safer team movements and site executions.
Example
As Brimstone, pre-smoke A Heaven and A Lamps when executing A Short. If rotating to B, drop smokes on B Elbow and Defender Spawn to cut off rotations.
Pro Tip
Time smokes with the push to avoid them fading before your team is in position.
Duelists
Lead site entries with decisive aggression. Employ abilities to clear corners and create space for the team. Agents like Raze and Jett can capitalize on their mobility and damage-dealing skills to disrupt defender setups.
Example
As Jett dashes into A Short after Skye flash blinds defenders, use Updraft to reposition and quickly create confusion during site entry.
Pro Tip
Save Tailwind for repositioning post-plant or for a quick getaway if the site take goes south.
Initiators
Gather intelligence and disorient defenders using recon and crowd-control abilities. Tools like Sova’s Recon Bolt or Skye’s Guiding Light can unveil enemy positions, setting the stage for successful engagements.
Example
As Sova, fire a Recon Bolt into Hookah or Showers to detect defenders early. If entering Hookah, use Owl Drone to clear tight corners before committing.
Pro Tip
Delay your utility until your duelists are ready to engage, ensuring maximum impact.
Sentinels
Secure flanks and provide team support through surveillance and area denial. Deploying Cypher’s Trapwires or Killjoy’s Turrets in areas like Showers and Hookah can alert the team to enemy movements and deter aggressive pushes.
Example
As Killjoy, place Nanoswarms at the entrance to Hookah and B Long to delay site pushes. Use her Lockdown ultimate post-plant to force defenders out of position.
Pro Tip
Use your utility during mid-rounds to watch flanks and prevent lurks while your team focuses on site control.
Bind Strategy FAQ
What’s the best way to use the teleporters effectively?
Teleporters on Bind allow for rapid rotations and misdirection. Use them to fake site hits or reposition quickly during mid-rounds. However, since the teleport sound is audible to enemies, always mix in fake teleports or coordinate with your team to capitalize on the distraction.
Which agents excel on Bind and why?
- Viper: Her Toxic Screen can cut off vision through crucial chokepoints like A Short and B Long.
- Raze: High mobility and explosive utility make her perfect for clearing tight areas such as Hookah and Showers.
- Brimstone: His long-range smokes allow precise map control, which is ideal for Bind’s multiple site entries.
- Cypher/Killjoy: Great for flank control and locking down key zones like Hookah or Showers.
How should attackers approach Bind’s A Site?
Control Showers and A Short to apply pressure on defenders. Utilize smokes to block vision from A Tower (Heaven) and A Lamps (U-Haul). Split pushes with a Hookah distraction can create confusion, forcing defenders to reposition. With the widened Showers entry and faster teleporter rotations, swift site takes are now more viable.
What’s the best strategy for defending B Site?
Lock down Hookah and B Long early with utility. Use Cypher or Killjoy to hold flanks and delay pushes. Since the CT entry has been widened, position yourself to play off-site post-plant. Adding the vent in B Elbow also allows for creative utility usage—Sage walls, flashes through the vent, and Molotovs to clear elbow control.
How should teams adapt their post-plant strategies on Bind?
After planting, play for long-range control by holding Showers (A) or Hookah/B Long (B). Viper’s Molotov lineups, Sage’s walls, and Sova’s recon can make retakes difficult for defenders. The vent on B Site adds another layer of complexity, allowing Skye or Gekko to flash through and disrupt retake attempts.


