")

Skins in Counter-Strike 2 (CS2) aren’t just cosmetic — they represent style, status, and in many cases, real-world value. But before you buy, trade, or open cases, it’s important to know how to inspect CS2 skins properly. Many beginners make the mistake of purchasing a skin that looks good on the market, only to discover in-game that its float value, wear level, or stickers make it far less appealing.
In this guide, we’ll walk you through how to inspect CS2 skins in-game, on the Steam Market, and even without owning them, plus explain key factors like rarity, float, and third-party tools. If you’re a trader looking to maximize profit or a player who just wants the perfect look, learning how to inspect skins the right way will save you money and help you make smarter choices.
Before investing in a skin, it’s very important to understand its rarity and quality. If you’re new to trading, check out our beginner’s guide to the CS2 skin economy to learn how value is determined.
Contents
- 1 Understanding Skin Inspection in CS2
- 2 Why Inspecting CS2 Skins Matters Before Buying or Trading
- 3 Key Features to Check When Inspecting a Skin (Float, Rarity & Wear Levels)
- 4 Step-by-Step Guide: How to Inspect Skins in CS2 Inventory
- 5 Inventory Inspection Process (In-Game)
- 6 How to Inspect CS2 Skins on the Steam Market
- 7 Maximizing Your Skin Review Process
- 8 Float Value Explained: How Wear Levels Affect CS2 Skins
- 9 Skin Styles and Patterns in CS2 (With Examples)
- 10 Using Third-Party Tools to Preview and Compare CS2 Skins
- 11 Common Problems When Inspecting Skins in CS2 (and How to Fix Them)
- 12 Dealing with Display Problems or Missing Skins
- 13 Common CS2 Skin Inspection Issues:
- 14 How do I inspect skins in CS2?
- 15 Can I inspect skins in CS2 before buying them?
- 16 What’s the best way to compare skins in CS2?
- 17 Why are my CS2 skins not showing up?
- 18 Conclusion
Understanding Skin Inspection in CS2
Counter-Strike 2 offers many game skins for operators, knives, gloves, and weapons. The game also has different stickers that you can apply to the desired weapon. This action changes the appearance of the weapon significantly because you can stick several of them at the same time. You can read more about this in our All About Stickers in CS2 (New Sticker System) article.
Players can get skins by playing CS2, opening containers, or buying them from other players in the marketplace. However, they can encounter problems, so the Blix team has prepared a step-by-step guide for our readers on properly inspecting CS2 skins.
Why Inspecting CS2 Skins Matters Before Buying or Trading
If you’re planning to trade items, it’s crucial to inspect CS2 skins before trading. Small details like float value, rare patterns, or sticker placement can change the skin’s worth by hundreds of dollars.
It’s crucial for every player to find a skin they like. Some players prefer stylish designs, while others prefer minimalist ones. Some players enjoy trolling, such as using a skin that produces loud sounds on the radio, making it difficult for other players to hear enemy movements.
Before investing in a skin, it is very important to understand its rarity and quality. StatTrack skins count the player’s kills from a specific weapon; their price is usually higher. You can also look at price charts to understand the skin’s price history.
If you’re planning to trade, our CS2 skin trading safety guide covers everything you need to know to keep your items secure.
Key Features to Check When Inspecting a Skin (Float, Rarity & Wear Levels)
As mentioned above, paying attention to Skin Quality and Rarity when inspecting or purchasing skin is essential.
| Skin Quality (Wear Level) | Float Range | Description / Visual Condition | Impact on Price |
|---|---|---|---|
| Factory New (FN) | 0.00 – 0.07 | Looks almost brand new, minimal scratches | Highest price |
| Minimal Wear (MW) | 0.07 – 0.15 | Slight wear, small visible marks | High price |
| Field-Tested (FT) | 0.15 – 0.37 | Noticeable scratches and fading | Mid-range price |
| Well-Worn (WW) | 0.37 – 0.45 | Heavy scratches and faded look | Lower price |
| Battle-Scarred (BS) | 0.45 – 1.00 | Extremely worn and damaged | Cheapest option |
Skin Quality is divided into Factory New, Minimal Wear, Field Tested, Well Worn, and Battle Scarred. These values determine the amount of scratches on the weapon and its overall appearance. Depending on the quality, the price of the skin will increase or decrease.
| Skin Rarity | Color Tier (Steam) | Notes |
|---|---|---|
| Consumer Grade | White / Grey | Most common, lowest value |
| Industrial Grade | Light Blue | Slightly more valuable than Consumer Grade |
| Mil-Spec | Blue | First tier of rare skins, often sought after |
| Restricted | Purple | More exclusive, moderate value |
| Classified | Pink | High rarity, expensive |
| Covert | Red | Among the rarest skins, very valuable |
| Contraband | Orange / Gold | Extremely rare, only one Contraband skin exists in CS2 |
Rarity includes Consumer Grade, Industrial Grade, Mil-Spec, Restricted, Classified, Covert, and Contraband skins. Speaking of Contraband, there’s only one Contraband skin in the game. As with Skin Quality, the higher the Rarity, the higher the price.
Step-by-Step Guide: How to Inspect Skins in CS2 Inventory
In this article, we will discuss methods for inspecting skins in your inventory and skins that you do not own but would like to see in-game. There are several ways to inspect skins.
Stay up to date with every release — our CS2 cases and souvenir packages article covers the newest items added to the game.
Inventory Inspection Process (In-Game)
First, let’s break down the default path to view the skins already in your inventory:
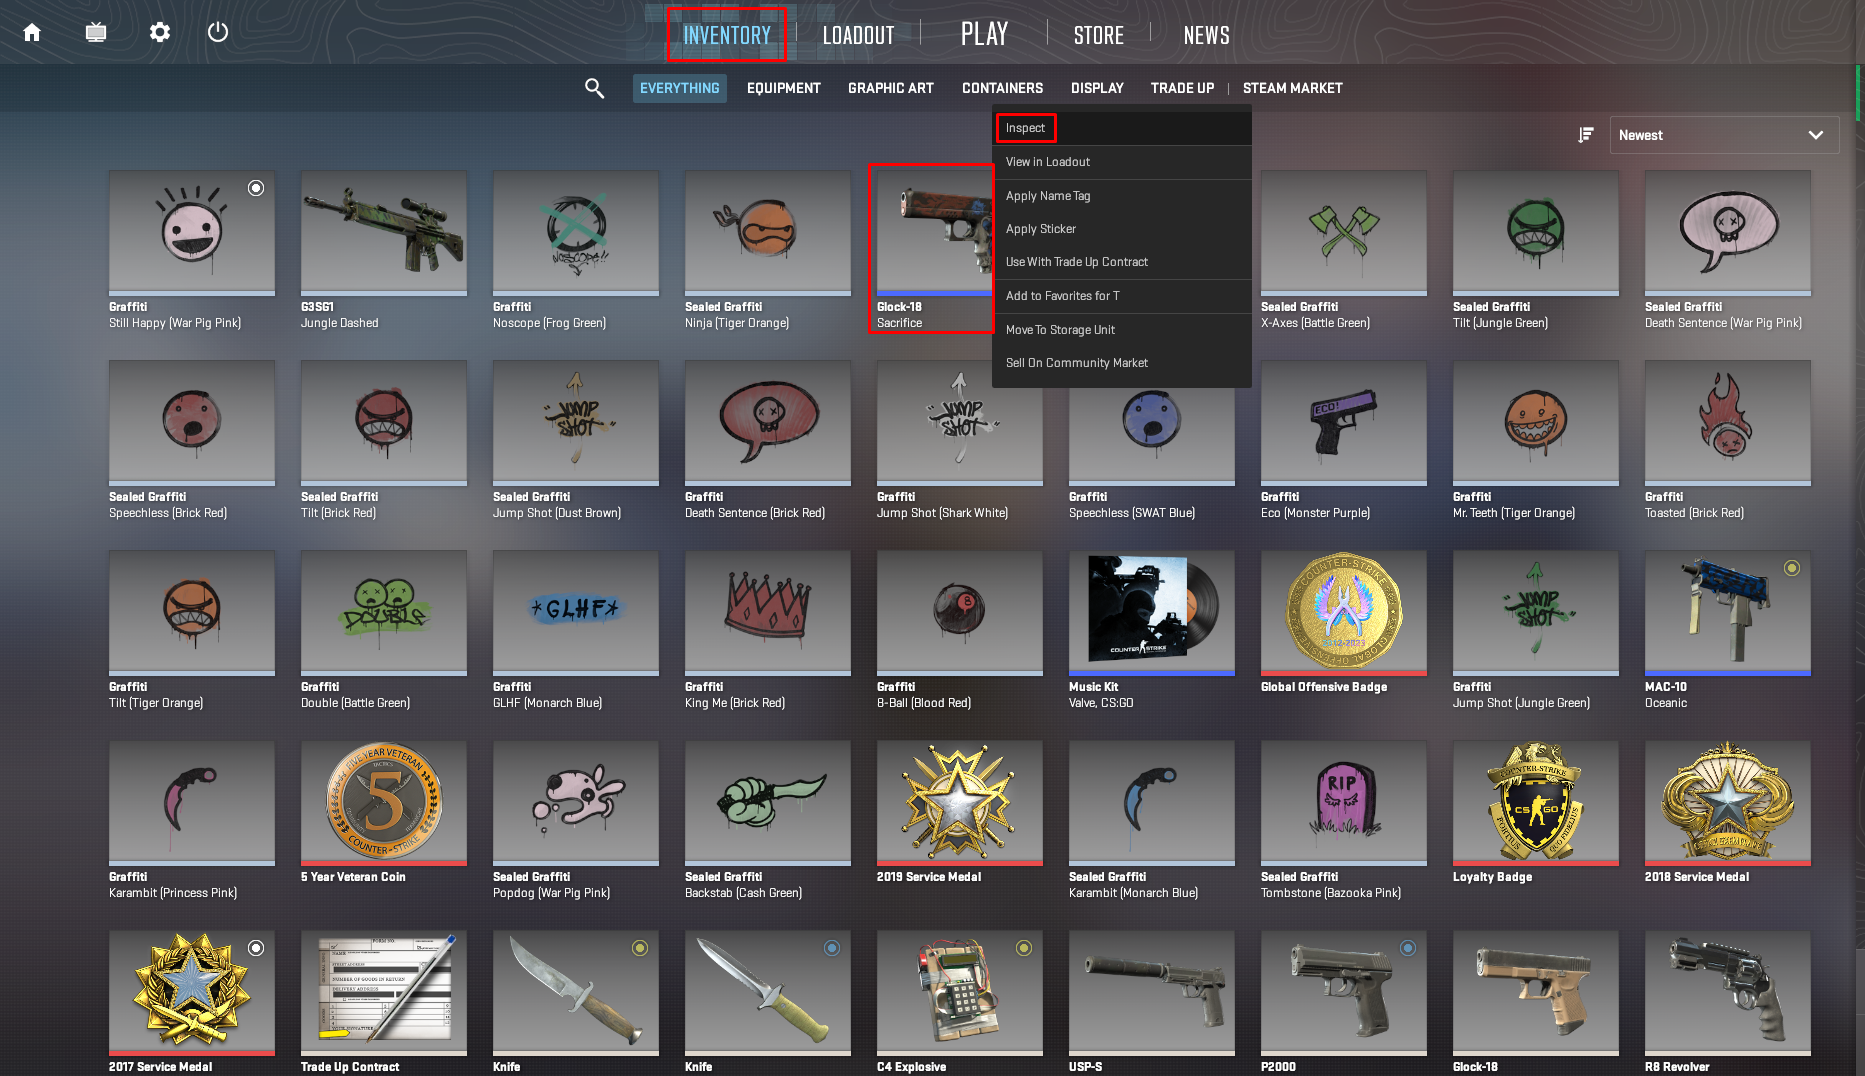
- Launch CS2
- Proceed to Inventory
- Choose the skin in the Everything section (you can use filters)
- Left-click on the selected skin, then Inspect
- Extra: first-person and player model inspect modes can be chosen at the bottom left of the screen.
How to Inspect CS2 Skins on the Steam Market
Using the Steam Market, you can run a CS2 skin inspection directly from the listing page. Just click ‘Inspect in Game’ and CS2 will launch, showing you the weapon in real time. This feature is perfect for traders who want to confirm float value, stickers, or patterns before purchasing.
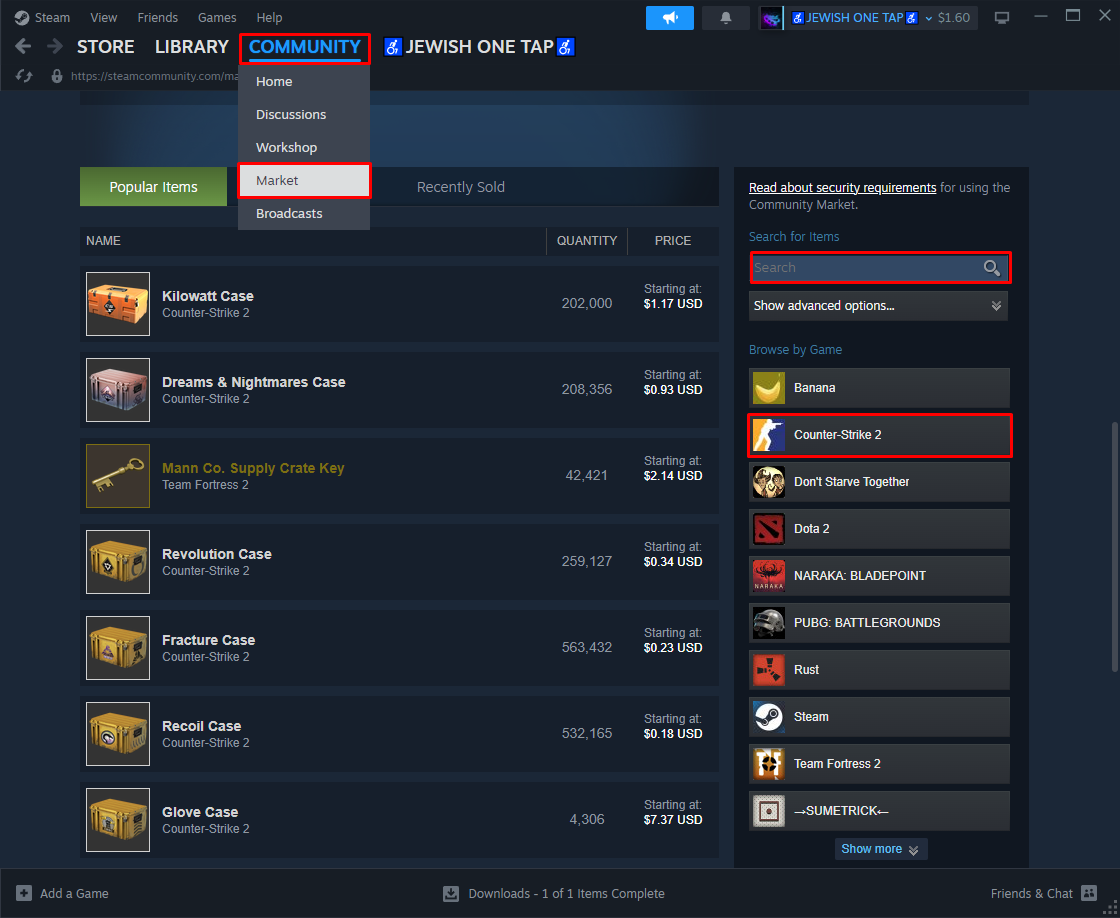
- Launch Steam
- Go to Community > Market section
- Scroll down and find the Search for items section
- Enter the name of the desired skin, then Search
- Select the skin
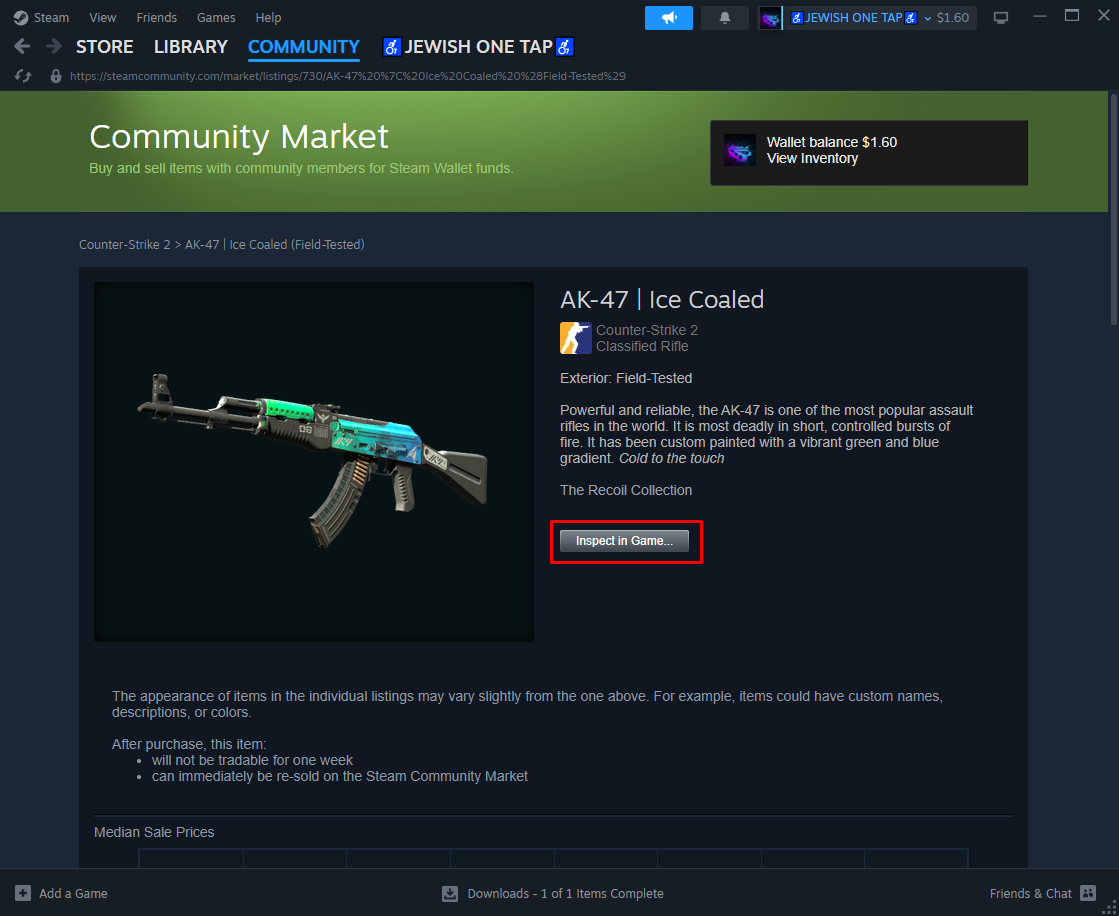
- Press the Inspect in Game button
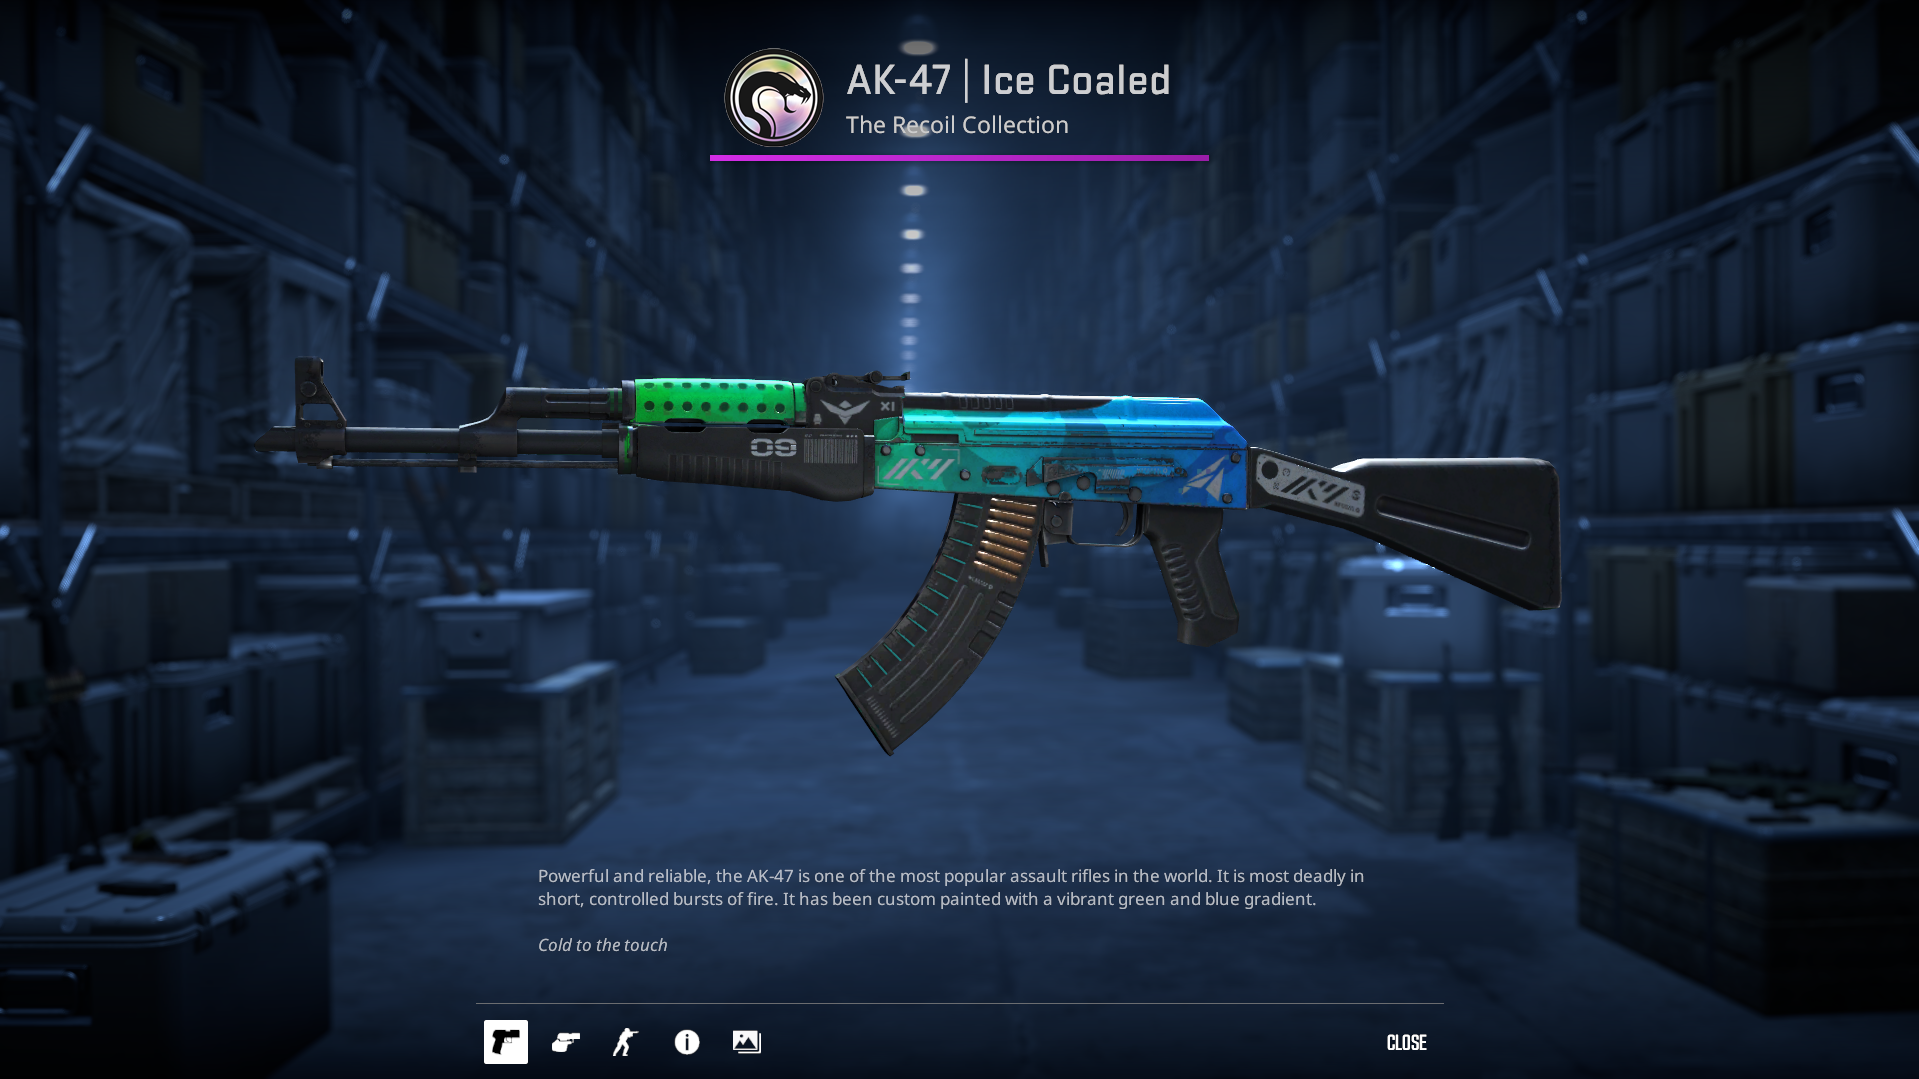
- CS2 will be launched to show the skin.
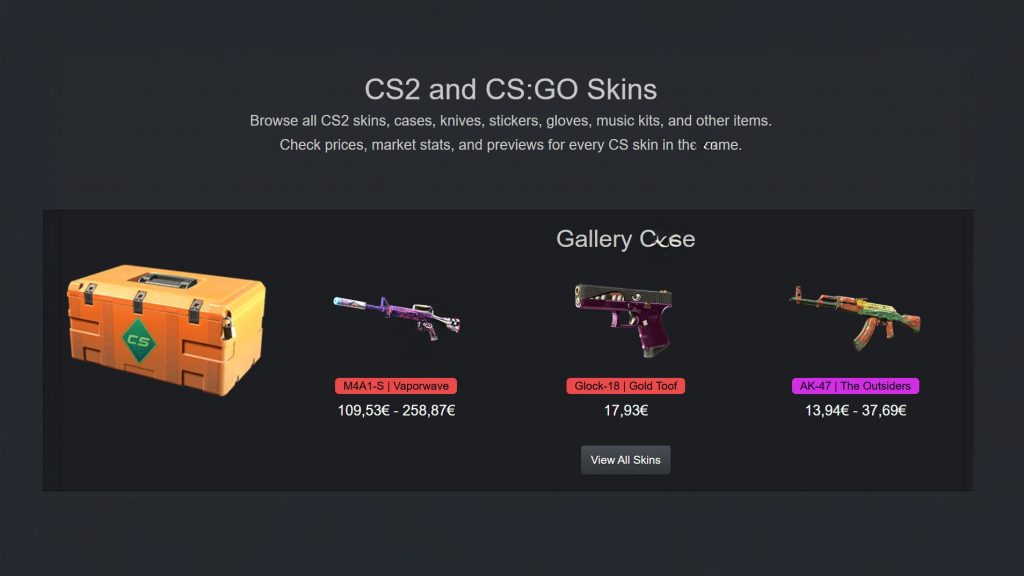
Maximizing Your Skin Review Process
For a quick view of all the skins available for CS2 – you can use the platform csgostash.com. The site has many filters and contains all information about the skin, including its price, release date, rarity, quality, and so on.
Float Value Explained: How Wear Levels Affect CS2 Skins

If you’re wondering how to check CS2 skin float value, it’s simple: every skin comes with a float between 0.00 and 1.00. You can see it directly in-game, or use third-party tools like CSFloat to check exact values before buying
CS2 offers five distinct types of Floats/Wear:
- Factory New, FN: from 0.00 to 0.07
- Minimal Wear, MW: from 0.07 to 0.15
- Field Tested, FT: from 0.15 to 0.37
- Well-Worn, WW: from 0.37 to 0.45
- Battle-Scarred, BS: starting from 0.45
Every skin in CS2 is assigned a Float Value or Wear at the time of creation, whether it’s dropped or crafted.
If you’re learning about floats, don’t miss our CS2 float value and pattern guide — it shows how small details can change a skin’s value by hundreds of dollars.
Skin Styles and Patterns in CS2 (With Examples)
Each skin differs in general appearance, contrast, and brightness. There are several skin styles in Counter-Strike 2:
- Custom Paint Job – you can see the absolute design freedom for such skins.
- Anodized – these finishes’ shine is much brighter than other skins.
- Solid Color – the weapon skins are divided into four predefined sections.
- Patina – is a thin layer that forms on metallic surfaces.
- Gunsmith – offers a stylish aging effect that combines Patina features with a Custom Paint Job.
- Hydrographic – such design incorporates a vibrant palette of four colors and an eye-catching pattern.
- Spray-Paint – it has four colors and a pattern, which are applied from three sides.
Want to play like the pros? Explore our best CS2 gear guide for the monitors, mice, and keyboards they trust.
Using Third-Party Tools to Preview and Compare CS2 Skins
Some players prefer faster options, so here are the best third-party tools to inspect CS2 skins without opening the game: CSGOStash (browse full collections), CSFloat (check float values).
- CSGOStash – A complete skin database with filters for rarity, collection, release date, and price ranges. Great for browsing entire sets.
- CSFloat – Lets you check exact float values of individual skins before purchase. Also offers a marketplace where traders list skins with detailed wear levels.
Tip: These tools often provide more information than the Steam Market, such as float history, price graphs, and pattern variations (e.g., rare Doppler phases or case-hardened blue gems). This makes them essential for collectors and traders looking to maximize value.
Common Problems When Inspecting Skins in CS2 (and How to Fix Them)
In CS2, inspecting weapons in the inventory menu is so hard on the GPU that it causes the game to crash. Lowering the FPS limit in the CS2 menu should help. There’s a discussion of such a problem on steamcommunity.
Some skins may look blurry in the match, but they are great in the Inspection menu. Here’s the link to Reddit where you can find helpful comments.
Dealing with Display Problems or Missing Skins
1. If you encounter the issue, try verifying the game files through Steam:
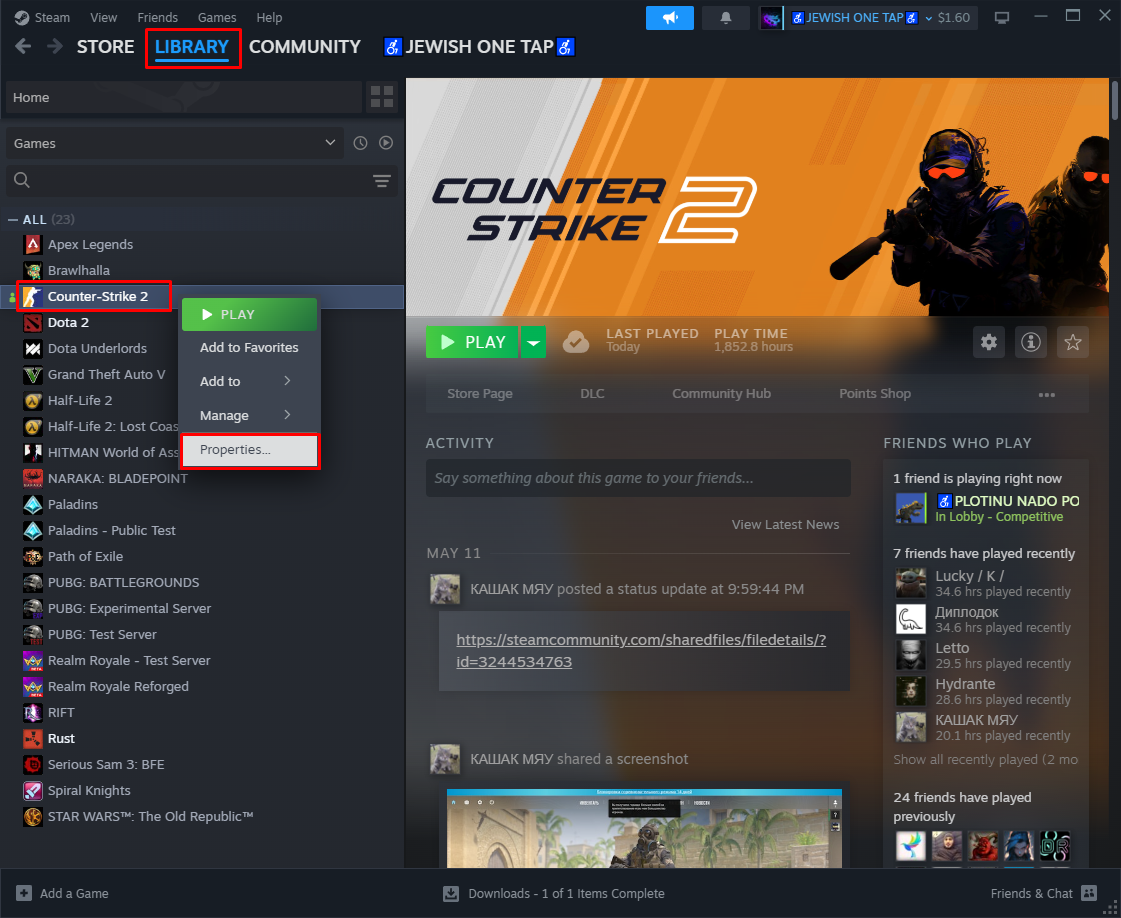
- Launch Steam
- Right-click on CS2, select Properties
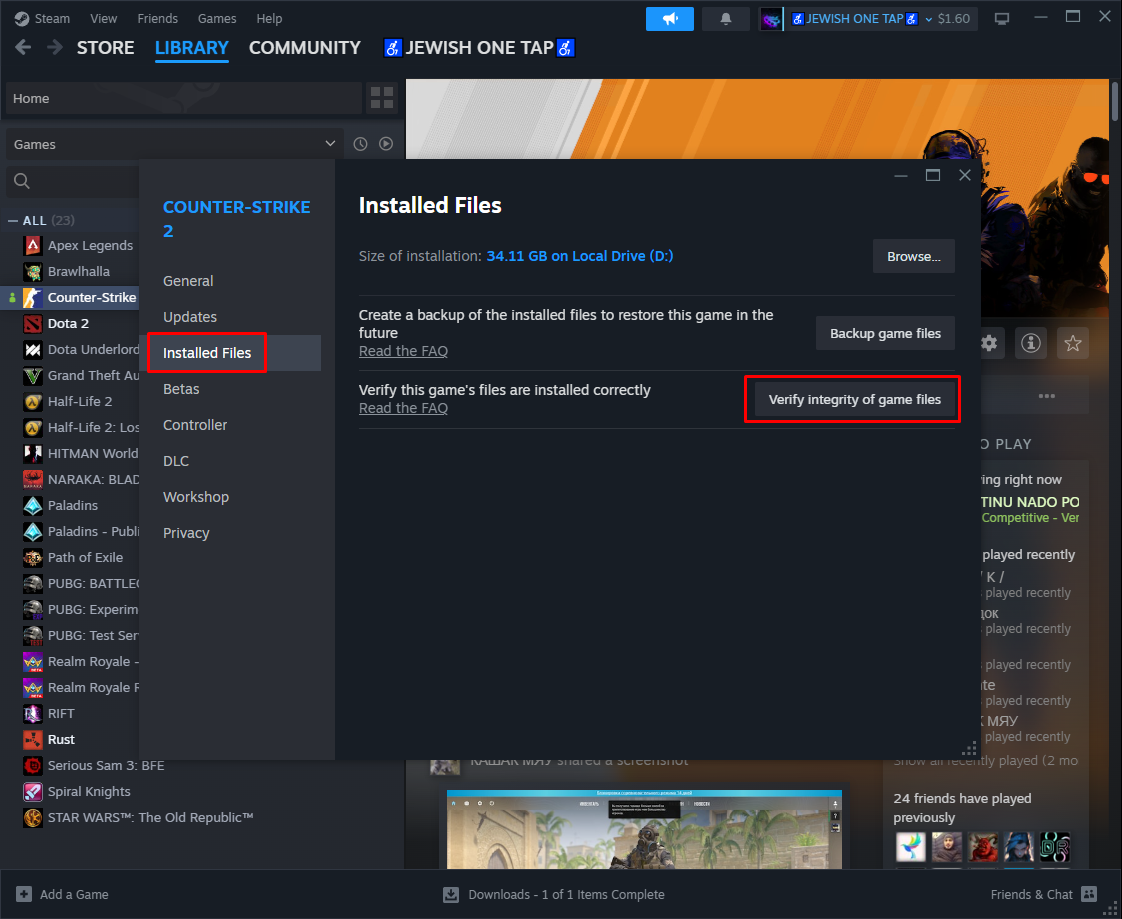
- Navigate to the Installed Files section
- Select Verify Integrity of Game Files
2. The last way is to Reinstall CS2 (if this step doesn’t help, then you should contact Steam Support regarding the situation):
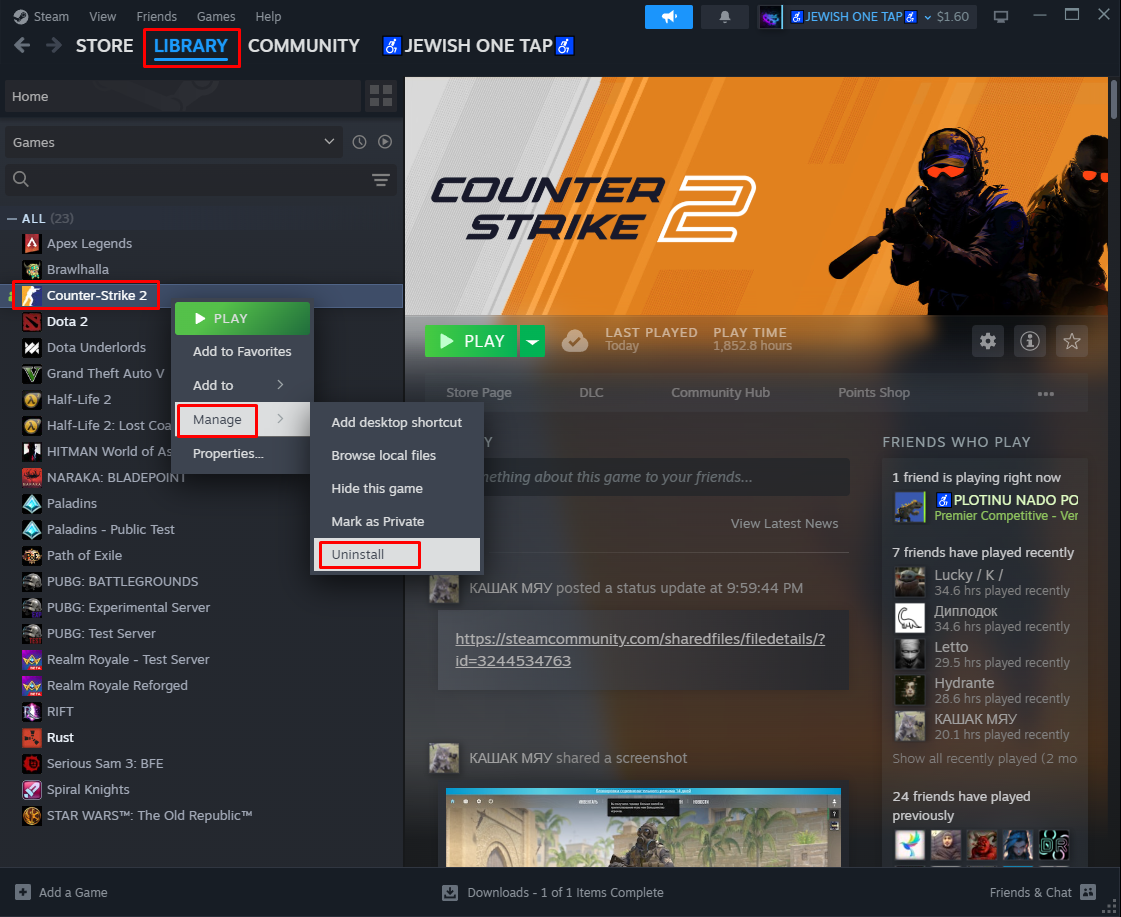
- Launch Steam
- Proceed to Library > CS2
- Right-click on CS2 > Manage > Uninstall
- Restart the computer
- Launch Steam > CS2
- Start downloading the game.
Common CS2 Skin Inspection Issues:
How do I inspect skins in CS2?
You can inspect skins in-game, on the Steam community market, and on websites.
Can I inspect skins in CS2 before buying them?
The answer is yes, but it’s essential to consider the Rarity and Float Value before purchasing, as the weapon’s durability is crucial.
What’s the best way to compare skins in CS2?
It would help if you compared the skins by Price, Rarity, and Float Value. The higher the Rarity or Float Value, the higher the Price.
Why are my CS2 skins not showing up?
Local files may be damaged, or the graphics card drivers may need to be updated. Both need to be checked.
Conclusion
Inspecting CS2 skins isn’t just about looks — it’s about making smart choices before you buy, trade, or open cases. By checking float values, wear levels, rarity, and patterns, you can avoid overpaying and make sure the skin you choose is truly worth it. Whether you inspect skins directly in-game, through the Steam Market, or with third-party tools like CSFloat and CSGOStash, the process is quick and can save you both money and frustration.