
2023 didn’t start the best way for Gwent. Slowly after the announcement by CD Projekt Red about the end of content drops and the official esports scene at the end of 2023, we’ve unfortunately seen a few of the notable content creators and competitive players shift their focus away from Gwent. Fortunately, the situation seems to have slowly stabilized. The Gwent community has reconciled with the future prospects and most of the players – both casual and competitive – have decided to give it everything in 2023. We’re also seeing an influx of new players thanks to the release of The Witcher 3: Next Gen Update. And that’s what brings me to the topic I wanted to focus on in this article.
We currently find ourselves at a rare period where the game balance seems so perfect, that it’s hard to conclude which decks are considered meta and which aren’t. We’re seeing the competitive players achieving sky-high MMR with decks such as Shupe + Radeyah or Keltullis & Dagon, decks that would not long ago be frowned upon as meme-y. This is a great opportunity to get creative, head to the deck builder, and let loose. And if you’re currently lacking inspiration or are new at the game and need a helping hand, we hope this article will prove useful and provide you with what you need.
Contents
Return of the Alumni
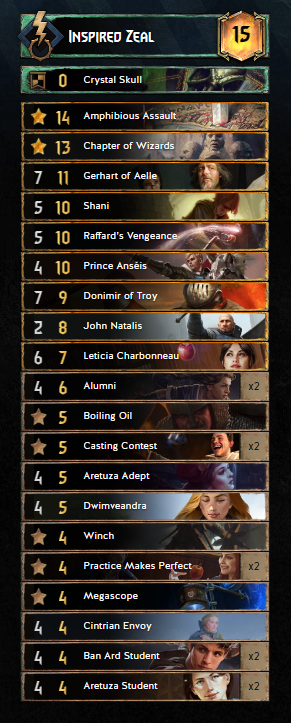
The first deck we’ll be going through is centered around an archetype I hold very dear. A similar list has been my gateway to Gwent, it was the first deck I crafted after playing the starter decks and if I can get more people to play Mages, I’ll consider my debt to Alumni paid in full.
Gameplan
The top priority with this deck is always to set up your Ban Ard and Aretuza students and get their patience values as high as possible. Use Leticia to help you with that and if possible, make use of the Defender to prevent locks or removals. Raffard’s Vengeance is also a great card for round one, it plays with a lot of tempo and helps with deck thinning. Always go for a long round one and prioritize your Patience build-up. Even if your opponent passes early, don’t think twice and keep playing all the way to four cards; dry pass in round two and unleash the power of Alumni in round three.
In round three, make use of cards like Chapter of Wizards, Shani, Gerhart, and Casting Contest. The focus is to get as many Alumni as you can and to keep replaying their Order ability.
The success is obviously heavily dependent on how successful you’ve been in round one and therefore this deck struggles against lists with heavy control. Despite that, I’m sure you’ll be able to secure some very satisfying victories against many decks. On top of that, this list is always a lot of fun to come back to and plays really nicely.
Force to be reckoned with
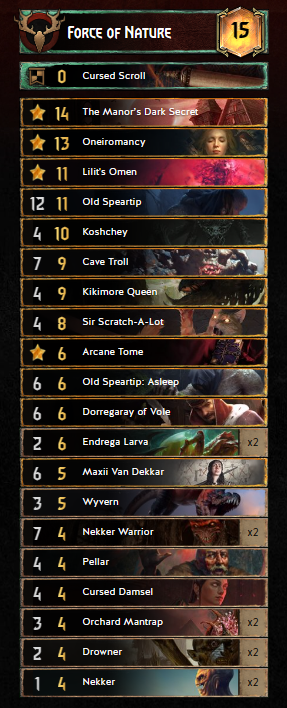
When Lilit’s Omen was released two months prior, it didn’t cause much excitement. To be fair, it’s not really surprising because the card doesn’t have many uses, however, there’s one particular deck where it can thrive, excuse the pun.
Gameplan
With this deck, the top priority is always to win the first round. You cannot allow your opponent to gain round control and bleed your good cards in the second round, because you’d be left with terrible draws for round three and lose. Start the game by playing your Scenario followed by as many Thrive units as you can. It’s also fine to play Speartip: Asleep – he can play for 18 points, and it helps thin your deck. If you can, play Maxii, too. It’s always good to know how your deck looks.
If you win round one early, you can try to push for 2-0 in round two. If you played long round one, wait until round three.
In round three, the key cards are Cave Troll, Sir Scratch, and Lilit’s Omen. Make sure Koshchey and Kikimore Queen are in your deck, not hand. Set up the Defender and Sir Scratch and make sure to not play other units in the same row as the Troll. Then, with five cards in hand (to utilize the Adrenaline 4 condition), play Lilit’s Omen on the row with your defender, summon Kiki and Koshchey, and trigger Thrive twice with Cat and Leader ability. Next step? Make yourself comfortable… and watch your opponent struggle to keep up with the crazy points you generate each turn.
Invigorate your appreciation for Scoia’tael
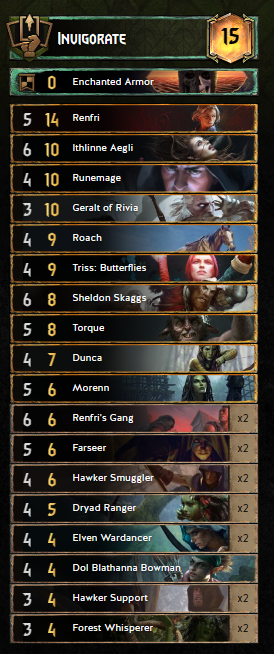
This next list is like Yin and Yang. It combines the wholesome nature of Invigorate with the ruthlessness of Renfri decks and creates something fresh and new.
Gameplan
Open the same way as you would with a non-Renfri Invigorate list – use two leader charges to boost each unit in hand except Farseer and Torque, then play Farseer to boost Torque and bounce the boost onto one of your other units. After you’ve done that, unlike the two previous decks, there’s no strict game plan you have to respect. Keep playing the way you deem fit, keep boosting your units, and set up your big finisher cards. Round control is a great thing to have, but if you can’t win round one, it’s not the end of the world.
Now, here comes the interesting part. Thanks to the fact we’re packing Renfri, we can try an alternative hyper-aggressive strategy instead. By playing Renfri early, if you roll the Cooldown: 8, you will be able to use your leader three times per match. You need some luck with both your draws and the Curses and Blessings, but if you play Runemage first, your chances of getting the latter right increase significantly. The go-to Renfri Leader ability for this list is the Stratagem spawn.
And while it’s not always possible to do this stunt, when you pull it off, it’s super strong and very satisfying. Thankfully, the deck is really good even when you’re playing in a more conventional way, and I had a lot of fun with it.
Sacrifices to the Blood God
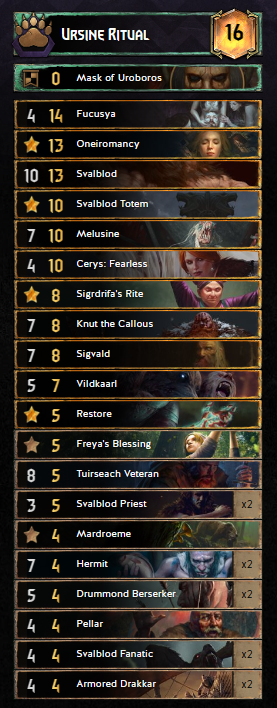
Next up we venture to the snowy isles of Skellige to pay tribute to Svalblod. If you want to play a Skellige deck that’s more complex and fun than the standard Raid deck or the Pirates Golden Nekker list, this is what you’re looking for.
Gameplan
We have quite a few options here, but we’re aiming to ideally set up our engines asap and place down Melusine so she can start increasing her base power early on. We also have an incredibly powerful combo with Knut and Sigvald that we can rely on and make even more deadly with Mardroeme. And if you really want to make your opponent desperate, keep your eye on the counter on Cerys. The absolute dream for us is to use Knut on Melusine, then use her Order and finish our turn by healing her with Cerys and damaging Sigvald. If you have all the four necessary puzzle pieces, there’s no deck that can outpoint this.
If you win round one, a little bleed in round two is highly recommended. If you can force your opponent to commit their good cards, we can go into short round three even while being card down and should still be fine due to the massive Melusine waiting in the graveyard. You can pair her with revived Knut and then finish up with Restore.
Or you can go for a longer round three, play the Totem and some Fanatics and Berserkers and then drop the atomic bear, also known as Svalblod. Especially against decks like Deadeye Ambush, Arachas Swarm, or Firesworn, Svalblod can play for more than fifty points and completely wipe the opponent’s side of the board.
Pray to Melitele
We’re staying among the gods for the time being and taking a look at another card that was introduced during the latest Sacred and Profane expansion – Melitele. A little warning first – if you feel sick at the sight of a merry-go-round, be careful not to get dizzy. We’ll be shuffling non-stop.
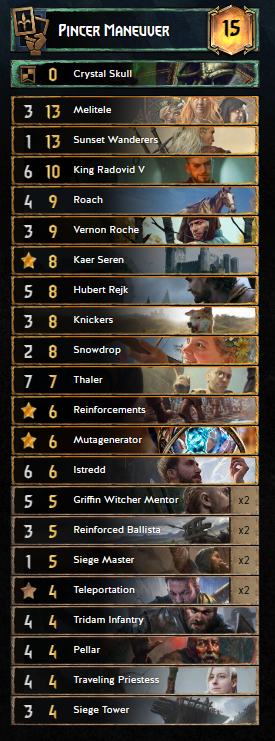
Gameplan
I’ve been trying a lot of different things with Melitele this season, attempting to figure out the optimal way to build a deck around her. In the end, I’ve settled on two versions, the one you’re seeing here being my favorite. The list is built similarly to the standard Travelling Priestess deck – the aim is to thin the deck down to only two cards remaining, those being Melitele and Priestess.
Start the game by playing Mutagenerator to get carryover value. Play Istredd and Snowdrop, and make sure to thin your Siege Masters. A long round one is great for us, we want to win it to secure round control and last say. Get as many shuffles as you can on both Melitele and Travelling Priestess.
If you won round one when being a card down, dry pass round two. If you won on even, feel free to play; at least you can utilize the Adrenaline condition on Witcher Mentors for more shuffles.
Round three is all about getting even more shuffles by replaying the Mentors. It’s ideal to keep at least one charge of your Leader, too. After doing all the possible shuffles, you’ll be left with two cards in your hand – Vernon Roche and Tridam Infantry, and two cards in your deck – Priestess, and Melitele. Use the leader to put Tridam back in your deck, draw and play Melitele. Then finish the round with Roche to get your last two cards for a huge finisher.
I highly recommend trying this deck out, it’s a very satisfying playstyle and can play for huge points.
Four Horses of the Apocalypse
The next list we will be going through might seem like a fairly standard Harmony deck, but there’s a twist to it. This deck is all about the unicorns. Right after I saw the patch notes for 11.1, I knew I wanted to make something focused on the Relict synergy with Quarixis and this is what I came up with.
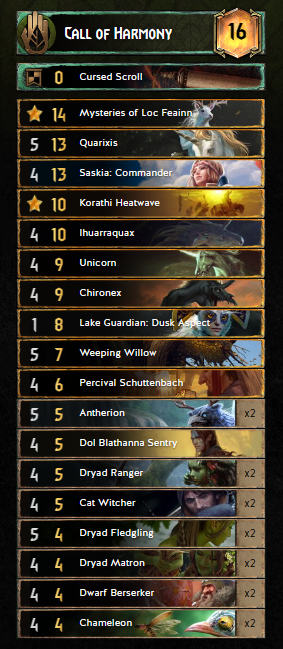
Gameplan
The way this deck is played is very intuitive and it generally mirrors the standard gameplan for all the other Harmony decks. You play Saskia for the tempo and thinning she offers. If you win round one, feel free to push for 2-0 with your scenario. If you suspect the 2-0 attempt won’t work, make sure to have an ace up your sleeve for round three. That means either having Lake Guardian ready in a short round three or making use of the unicorn synergy that I’ll explain in a moment.
If you lose round one and the opponent tries to bleed you, don’t be scared to play the scenario or your unicorns ‘ but never both, that would majorly weaken you in the last round.
And now to the unicorns. The idea is to keep Quarixis in your deck and summon him with Ihuarraquax which gives you an extra trigger on Quarixis. Pair that with your leader and you’ve suddenly played two extra bronze cards without giving your opponent any chance to prevent it with locks or removal. Even better, if they can’t do that during their next turn, we’ll play Unicorn and Chironex for another two Quarixis triggers.
And that’s not everything. You can use Ihuarraquax as a tech card instead. Let’s say you are on a red coin, drew Quarixis, but not Saskia and there’s no Cursed Scroll for you to get her. No worries, Ihuarraquax will get her for you. Even better, opening with him in round one guarantees that he will pull one of your opponent’s most important cards and ruin his day.
Dagon & Dragon
One of the latest discoveries in Gwent is the unexpected combination of Keltullis and Dagon which seems to work extraordinarily well. The best thing? It’s not just strong, but also remarkably enjoyable to play.
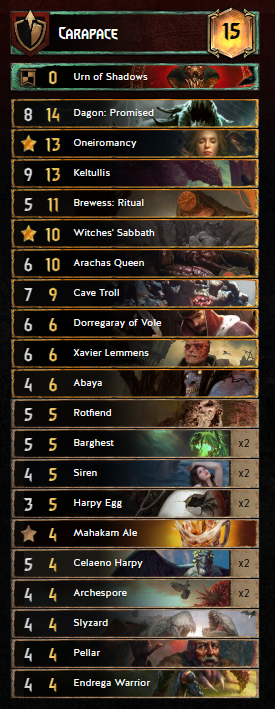
Gameplan
Winning round one is a big priority, otherwise, there’s a huge risk of the opponent forcing us to give up our key cards while defending the round two push. Blue coin plays in our favor, but we can be just as successful from red. Play Brewess for massive tempo gain and the benefit of deck thinning. If you haven’t drawn her, feel free to play Cave Troll and Keltullis, we will be bringing them back with Witches’ Sabbath anyway.
If you’ve drawn your gold cards, pushing in round two is highly recommended. Hide Dagon behind your Defender, when he reaches Timer 5, play Abaya and Arachas Queen. Use your leader to prevent your cards from getting locked. If your opponent manages to cover your push, it’s great if you can Purify your Dagon to rid him of the Doomed status. This way you can bring him back from the graveyard.
Open round three with Sabbath, or, if necessary, use Xavier before that, to take care of the strongest units from the opponent’s discard pile. Make sure to keep enough consumes in hand and you should be fine.
Discard your Troubles
The final deck we have takes us back to Skellige. This time, however, there’s a special guest – Renfri and her gang. The idea behind this list is simple. What’s the biggest weakness of all Renfri decks? Lack of consistency – with 25 units it’s often the case that you don’t draw many of your good cards, sometimes even Renfri herself. And that usually puts you in a very difficult situation.
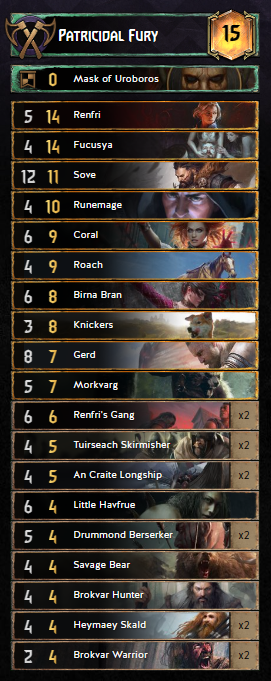
By putting her in a list that specifically focuses on fully thinning your deck by discarding some of your worse cards, we immediately nullify the chances of not drawing our key golds and drastically improve the consistency.
Gameplan
Seizing round control by winning the first round is highly recommended. Keep in mind that this deck doesn’t like long rounds – it will always eventually get outpointed by engine decks. However, it is incredibly strong in shorter rounds and after playing Coral, Birna, and Renfri’s Gang, you should find yourself in a massive lead, often forcing the opponent to pass.
In round two keep playing as long as it feels right. Even if you’ll have to go into the last round being a card down, it’s not a problem as long as you have Renfri, Sove, Fucusya, and your Leader ability ready.