
Welcome to the Ultimate Sunset Guide by the Blix team! Sunset offers a blend of tight corridors, open lanes, and breakable doors that introduce countless tactical possibilities. We know it all pretty well, as you may see from our articles on how to rise to Gold or which agents dominate the meta.
Sunset’s layout rewards teams that control Mid and execute coordinated site takes, but small mistakes can instantly flip the momentum. With agent-specific insights, strategic setups, and map control tips, this guide ensures you’re not just reacting to plays—you’re dictating them.
So, to stay ahead in competitive play, it’s essential to master site control, mid dominance, and creative utility usage—and this guide delivers exactly that.
Contents
- 1 Highlights
- 2 Sunset Map Overview
- 3 General Tips for Sunset
- 4 Prioritize Mid Control
- 5 Utilize Breakable Doors Strategically
- 6 Agent Selection Matters
- 7 Adapt to Sunset’s Unique Layout
- 8 Three Strategic Approaches on Sunset
- 9 Mid Control Emphasis
- 10 B Site Overload
- 11 A Site Split Push
- 12 Role-Specific Advice for Sunset
- 13 Controllers
- 14 Duelists
- 15 initiators
- 16 Sentinels
- 17 Sunset Strategy FAQ
Highlights
- Overview of Sunset’s layout and key areas.
- General advice to dominate on Sunset.
- Three distinct strategies with agent recommendations.
- Tailored tips for each role to maximize effectiveness.
- Additional: FAQ for mastering Sunset.
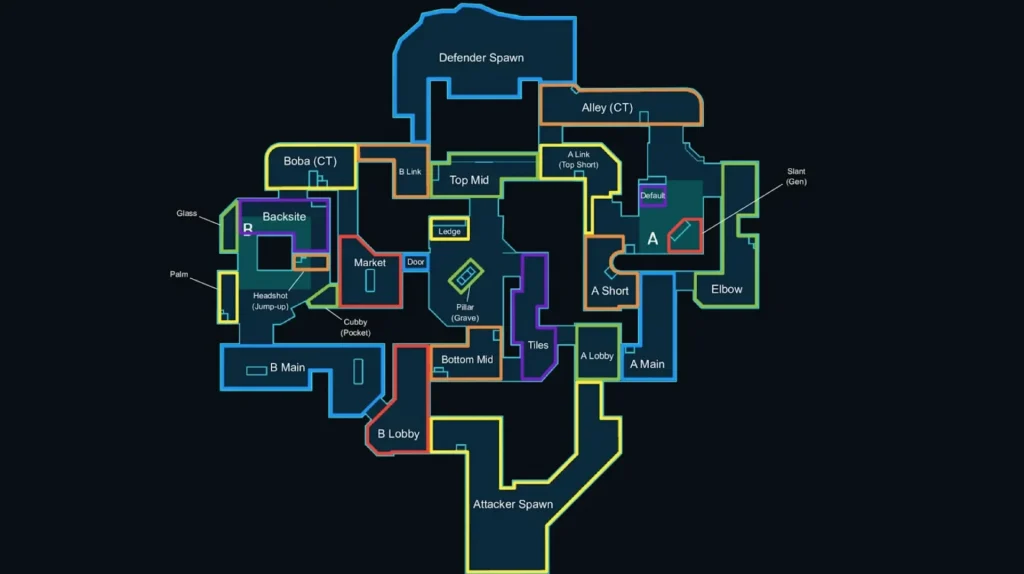
Sunset Map Overview
Sunset presents a blend of open areas and confined spaces, reminiscent of Ascent but with its own unique challenges. The map features two primary sites—A and B—connected by a central Mid area, which serves as a pivotal point for both attackers and defenders. Notably, Sunset incorporates breakable doors on both sites, similar to Ascent, adding layers of strategy to site executions and defenses.
In this condition, the list of key callouts be like this:
- Mid Courtyard: The central zone that connects both sites, crucial for rotations.
- Mid Pillar: A common holding position that offers partial cover.
- A Main: The primary entry point for attackers pushing A site.
- B Main: The main attacker entry for B site, often contested early.
- A Tower: Elevated position overlooking A site, vital for post-plant holds.
- B Pillar: Central cover point in B site, often a defender anchor spot.
- Breakable Doors: Located on both A and B sites, they can be destroyed to alter rotations and sightlines.
General Tips for Sunset
Prioritize Mid Control
Dominating the mid area grants teams the flexibility to pivot between sites and disrupt enemy rotations. Securing the mid allows for split pushes and creates opportunities to catch opponents off-guard.
Example
As an attacker, gaining control of Mid enables your team to pressure both A and B sites simultaneously, forcing defenders to spread thin and react unpredictably.
Utilize Breakable Doors Strategically
Sunset’s breakable doors can be leveraged to control enemy movement and sightlines. Destroying or preserving these doors should align with your team’s tactical objectives.
Example
On defense, keeping the B site door intact can hinder attacker entries, while on offense, breaking it down might facilitate a swift site take.
Agent Selection Matters
Choosing agents whose abilities complement Sunset’s layout can significantly impact your team’s performance. Controllers like Harbor and Viper can effectively block sightlines, while Initiators like Skye provide valuable intel in tight corridors.
Example
Utilizing Harbor's bendable wall can cover multiple angles during a site push, reducing exposure to defender positions.
Adapt to Sunset’s Unique Layout
Sunset’s design lacks gimmicks like teleporters or ziplines, focusing instead on straightforward engagements. Familiarize yourself with its three-lane structure to anticipate enemy movements and plan executions effectively.
Example
Understanding that B site has only one main entry point can inform your team's decision to allocate resources accordingly during both attack and defense.
Three Strategic Approaches on Sunset
Mid Control Emphasis

Attack Scenario
Securing Mid dominance allows attackers to split defenses and create multiple pressure points.
Goal
Establish control over Mid to facilitate flexible rotations and site executions.
Best Agents

- Omen: Utilizes smokes and teleportation to control Mid sightlines and reposition effectively.
- Skye: Provides intel and healing, enhancing team sustainability during Mid skirmishes.
- Raze: Clears tight Mid angles with explosives, creating space for the team.
Setup
- 2 Players: Push Mid aggressively to contest control.
- 1 Player: Hold A Main to apply pressure and prevent rotations.
- 1 Player: Control B Main to threaten multiple entry points.
- 1 Player: Lurk near Mid Courtyard to catch rotating defenders.
Execution
- Omen: Deploys smokes to obscure defender sightlines in Mid.
- Skye: Uses Trailblazer to scout and flash opponents in Mid Pillar.
- Raze: Utilizes Paint Shells to clear common defender positions in Mid Tiles.
- Team: Once Mid control is secured, coordinate a split push onto the chosen site, leveraging the compromised defender positions.
Pro Tips
Use Utility in Waves: Stagger utility such as smokes, flashes, and recon abilities to contest Mid over time,preventing defenders from regaining control.
Force Rotations: Gaining Mid control puts pressure on defenders to rotate. Fake a site commit to draw defenders away and exploit the weakened site.
What do you think about the Val maps: Sunset
Reddit
Defense Scenario
Controlling Mid on defense prevents attackers from splitting sites and forces them into predictable, choke-pointed entries. Locking down Mid early reduces the risk of attackers manipulating rotations or executing split pushes.
Goal
Deny Mid control to attackers, limit their map mobility, and make site takes more predictable and easier to counter.
Best Agents
- Cypher – Provides intel and flank protection with Trapwires and Spycam.
- Viper – Uses her Toxic Screen to block vision and stall Mid pushes.
- Sova – Gathers early information with Recon Bolt and denies Mid space with shock darts.

Setup
- 2 Players: Anchor Mid Pillar and Mid Courtyard to contest Mid control.
- 1 Player: Hold A Main with the defensive utility to slow down pushes.
- 1 Player: Position near B Main to contest or rotate based on Mid intel.
- 1 Player: Play near Mid Doors to reinforce Mid or provide quick rotations between sites.
Execution
- Cypher: Sets up Trapwires across Mid Courtyard and a Spycam near Mid Pillar to detect early movement.
- Viper: Deploys her Toxic Screen to block Mid Tiles and Mid Courtyard, cutting off attacker sightlines.
- Sova: Fires a Recon Bolt into Mid to reveal attackers trying to take control. If pressure builds, he uses Shock Darts to delay the push.
- Anchor Players: Adjust positions based on information gathered from utility—ready to reinforce either site if needed.
Pro Tips
If attackers aggressively contest Mid, delay their push with layered utility and rotate a support player to reinforce Mid Doors or Pillar.
Denying Mid control limits split options for attackers, forcing them into A Main or B Main, where defenders can focus their resources.
B Site Overload

Attack Scenario
Focusing resources to overwhelm B site can catch defenders off-guard, especially given its single main entry point.
Goal
Execute a concentrated attack on B site to exploit its limited entryways.
Best Agents
- Harbor: Utilizes bendable walls to block multiple sightlines during the push.
- Viper: Deploys Toxic Screen to segment the site and facilitate safer entries.
- Breach: Uses flashes and stuns to disorient defenders in B site corners.
Setup
- 3 Players: Gather at B Main for the primary push, ready to overwhelm site defenders.
- 1 Player: Position near Mid Courtyard to apply pressure and prevent rotations through Mid Doors.
- 1 Player: Lurk near A Main to catch any flanking defenders or apply late-round pressure on A site if a rotation is necessary.
Execution
- Harbor: Deploys High Tide to curve around B Pillar and obscure defender sightlines.
- Viper: Drops her Toxic Screen to split the site, cutting off rotations from Defender Spawn and Mid.
- Breach: Uses Fault Line to concuss defenders holding deep angles, followed by a Flashpoint to blind any remaining threats.
- Team: Push into the site aggressively, clear B Pillar and back site, and plant the spike in a position favorable for post-plant control.
Pro Tips
Bait Utility First: Use flashes or noise in B Main to draw out defender utility (such as molotovs or Sage Slow Orbs), making the actual push easier.
Split Pressure with Mid: Apply light pressure from Mid or Mid Doors to keep defenders anchored, preventing a full defensive stack on B site.
Defense Scenario
Preventing a complete B site take requires early information and effective utility use.
Goal
Delay and contain B site aggression while setting up for retakes.
Best Agents
- Killjoy: Locks down B site with Turret and Alarmbot to delay entry.
- Harbor: Uses his walls to cut off B Main and buy time for rotations.
- Breach: Provides crowd control with Fault Line and Aftershock to disrupt site entries.

Setup
- 2 Players: Hold B Main with Killjoy’s utility and Breach’s flashes.
- 1 Player: Anchor Mid Doors to control rotations.
- 1 Player: Rotate between Mid and A to reinforce the weaker site.
- 1 Player: Play deep on site with Harbor for post-plant retake potential.
Execution
- Killjoy: Deploys her utility to slow attacker entry into B Main.
- Harbor: Uses High Tide to cut off attacker sightlines from B Main.
- Breach: Concusses and flashes key areas to delay site control.
- Team: Hold off initial pushes and play for a well-coordinated retake if needed.
Pro Tips
Delay with Utility: Time utility like smokes, molotovs, and Sage walls to deny attackers an early push. Layering utility ensures attackers can’t rush B easily.
Retake Awareness: If B is overwhelmed, play for retake with utilities like Killjoy’s Lockdown or Brimstone’s Post-Plant Molotovs to clear site.
A Site Split Push

Attack Scenario
A split push onto A site applies pressure from both A Main and Mid Courtyard, forcing defenders to divide their attention and utility.
Goal
Gain control over A Main and Mid Courtyard to execute a well-coordinated pincer attack on A site.
Best Agents

- Phoenix: Initiates the push with curveball flashes to clear close angles.
- Killjoy: Locks down flanks and provides post-plant control with Nanoswarms.
- Omen: Smokes off Defender Spawn and A Tower to allow safe entry.
Setup
- 2 Players: Push A Main with utility to secure early map control.
- 2 Players: Take Mid Courtyard control to apply pressure and split defenders.
- 1 Player: Hold B Main for lurk potential or quick rotations.
Execution:
- Killjoy: Deploys her Turret and Alarmbot to watch the flank while the push happens.
- Phoenix: Flashes A Main to blind defenders and forces them off key angles.
- Omen: Smokes A Tower and Defender Spawn, providing safe passage for the team.
- Team: Converge on A site from both A Main and Mid, overwhelming defenders and securing the plant.
Pro Tips
Coordinate Entry Timing: Time the push from A Main and Mid so defenders are forced to look in multiple directions at once. A staggered push makes it easier to overwhelm defenders.
Fake Mid Control: Show early Mid presence and rotate late to A to mislead defenders, creating an easier split entry.
Defense Scenario
Securing A Main and Mid early forces attackers into predictable engagements.
Goal
Deny attackers space in A Main and Mid to limit site execution possibilities.
Best Agents
- Sage: Slows down pushes with Slow Orbs, and fortifies A Main with Barrier Wall.
- Phoenix: Flashes aggressively to contest A Main and Mid control.
- Cypher: Provides intel with Spycam and Trapwires, securing critical entry points.

Setup
- 2 Players: Hold A Main and contest Mid control.
- 1 Player: Anchor A site from A Tower with defensive utility.
- 1 Player: Play Mid for fast rotations and map control.
- 1 Player: Rotate between Mid and B sites for reinforcement.
Execution:
- Sage: Deploys Barrier Wall in A Main to block initial pushes.
- Phoenix: Flashes into A Main to contest space and delay attacker advances.
- Cypher: Provides constant intel with Spycam and Trapwires, allowing defenders to react based on attacker movements.
- Team: Hold off early pushes and reposition as needed to reinforce weak sites.
Pro Tips
Anchor U-Haul and Tower: Have one player hold U-Haul and another on A Tower to control A site crossfire. This makes it harder for attackers to isolate defenders.
Pre-Smoke Mid Doors: Deny Mid control early by smoking or walling Mid Doors, forcing attackers to commit more utility to take space, slowing their split.
Role-Specific Advice for Sunset
Controllers
Use Harbor’s High Tide and Viper’s Toxic Screen to control Mid and site entries.
Pro Tip
Delay smokes to disrupt attacker executes at critical moments.
Duelists
Lead site entries with Raze or Phoenix, using a utility to clear corners and create space.
Pro Tip
Save aggressive abilities for post-plant retakes when defenders are vulnerable.
initiators
Use Skye’s Trailblazer or Sova’s Recon Bolt to gather intel before committing to site executes.
Pro Tip
Delay utility to counter mid-round rotations and force defenders to reposition.
Sentinels
Place Cypher’s Trapwires or Killjoy’s Alarmbot to secure flanks and prevent split pushes.
Pro Tip
Use utility mid-round to gather crucial intel on enemy rotations.
Sunset Strategy FAQ
What’s the most important area to control on Sunset?
Mid Control is critical, as it allows for fast rotations and split attacks on both sites.
How can attackers best utilize Sunset’s breakable doors?
Destroy doors to increase pressure on defenders or keep them intact to slow down retake attempts.
Which agents are strongest on Sunset?
Harbor, Viper, Omen, Killjoy, and Sova excel at controlling lanes and providing critical utility.
What’s the best strategy for post-plant setups?
Play for Mid control after the plant, allowing defenders to contest from fewer predictable angles.
How should defenders counter aggressive Mid pushes?
Utilize Viper’s wall and Cypher’s utility to slow pushes and gather intel before rotating.